Another week and another organized kitchen cabinet! Today we are moving into possibly my favorite cabinet…the baking cabinet. If you don’t have a dedicated baking cabinet or your baking cabinet is in total disarray, let’s get it in shape by creating an organized baking station!

I’m going to be honest. My baking cabinet has not always looked like this. In fact, about 6 months ago, my baking cabinet was so full and so disorganized that I was beginning to hate baking. It was a sad day and I knew something needed to be done.
I decided to pull out all of the items from this cabinet and purge a ton of stuff I wasn’t using. I also moved all of my bulk items like wheat and sugars into my pantry. I also had several of these items stored in other places. So when I would bake, I would be running all around my kitchen trying to find a measuring spoon or rolling pin. Honestly, it was ridiculous.
I decided exactly what I wanted to keep in this cabinet. I dedicated it specifically to baking. Any tool, gadget, or small food item I might need for baking would live in this cabinet.
Just a few organizing tips before I walk you through the space:
- I always try to put the most used items at eye level and then work my way up based on use.
- I suggest using baskets or bins to coral small items that can easily get lost in the back of a cabinet.
- Make sure to purge everything that you don’t use. If you won’t use it, don’t let it take up valuable real estate in your home.
- Label. Label. Label. It will help you remember where things go. But more importantly, it will help others in your house know where to find things and put things away.

I knew I needed to coral items as best as possible so I opted to use baskets I found on sale at Walmart for just $1.75 each. I also used my favorite Lazy Susan for my most used baking items.
I created labels on Canva (free) and printed them on card stock. I then used my laminator for durability and used a dab of hot glue to secure them to the baskets.

I love using Lazy Susans when possible because they really allow you to get to things easily without digging in the back of the cupboard.

Yes, I have an entire basket filled with sweeteners. I told you I love to bake!  I also use the small space behind the center of the cabinet for my most used items like vanilla and my bread slicer. Both of these items are used on an almost daily basis.
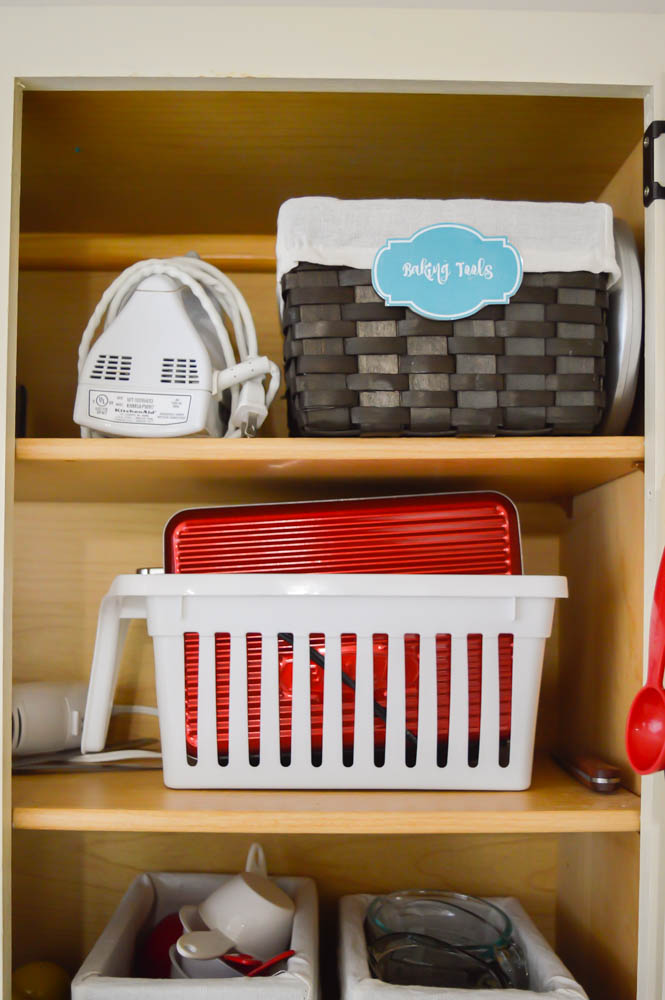
Because I have very limited drawer space, I opted to use a basket on the top shelf of this cabinet for some of my baking tools. These include things like my rolling pin, beaters, and biscuit cutters. They aren’t items I use every day, but are things I want to be able to access quickly if need be.
You will also see that we store our toaster in a basket. This really helps to eliminate the amount of crumbs in the cabinet. Before doing this, I would have to take everything out of the cabinet and use my vacuum to really give it a good cleaning at least once a month. Now that I use this basket, I can just easily dump out the crumbs from the bottom of the basket every so often and my shelves stay nice and clean!
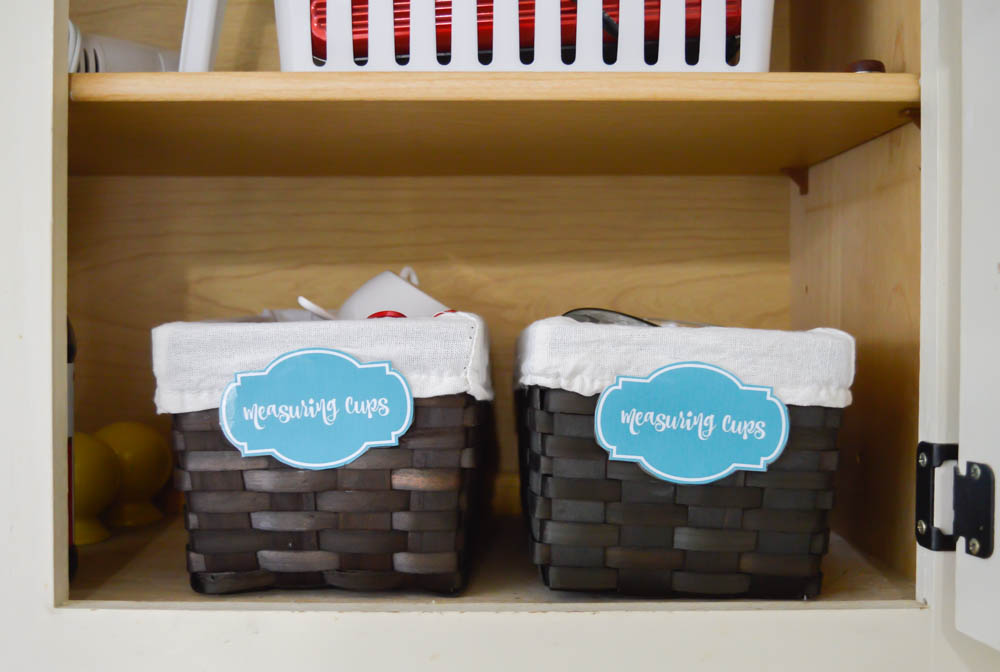
I also moved my measuring cups to this cabinet. For some reason, I previously had these stored in a cabinet on the other side of my kitchen. I was constantly going back and forth to grab what I needed when baking. I love that they are now stored in here.
Again, I’m very limited on drawer space, so I opted to store all of my measuring cups in baskets in this cabinet instead. It has worked out really well. If you have the drawer space, you might prefer to store them there. But if you are like me a basket in a cupboard might be a good option!
No, the measuring cups aren’t all stacked neatly because that’s not realistic to keep up with. The baskets hide the clutter, but I can easily find what I need. It also makes putting them away after use easy because I can just toss them in quickly.

The last bit of organization in this cabinet is located on the door. My husband screwed a 1×2 board into the door and we added little hooks to hang our measuring spoons. This might be my favorite part of this entire cabinet! Before, I had these stored in a small bin in a drawer and it was a nightmare trying to find the spoon I needed. Now that I have them sorted, I can just open the door and grab exactly what I need quickly.
Yes, I have 4 sets of measuring spoons! And, YES, I use them all! (Almost all of these end up in the dishwasher each night.) If you use it and love it, then keep it. But get rid of the rest. It will allow you to really enjoy the things you really do love!
So that’s my baking cabinet! I don’t know about you, but I’m loving working through my kitchen and really getting things back to the basics. We will be continuing on next week in our kitchen organization series as we jump into our kitchen drawers and talk about all of those utensils and kitchen linens.
Looking for more kitchen organization posts?
Do you have a dedicated baking cabinet?
The post Kitchen Organization: Create a Baking Station appeared first on The Simply Organized Home.